66 KiB
- Chapter 1 introduction
- Chapter 2 Novelties in program
- Chapter 3 The image calculation
- Chapter 4 A new material concept is introduced
- Chapter 5 The material manager
Chapter 1 introduction
1.1 Foreword
Dear Customer,
welcome to the new version 4 professional of CINEMA 4D. compared to the predecessor two drastic changes of importance:
- For the first time, CINEMA 4D will be released primarily on CD ROM shipped. (The delivery of a set Installation disks are available at an additional cost.)
- Due to a lack of demand, we have the normal version set. So there is “only” them Professional version.
This time, many customers will ask themselves why half it with this version instead of a new one Addendum to the Addendum to the Handbook.
The reason is simple. meanwhile use many users zen our CINEMA 4D. and it is precisely these people that we have thought of here. Nothing is more troublesome than having the manual to one new version when reading find that one already know most of it.
The result is that the really important new ments, additions and above all changes simply be overlooked. And that's exactly what we want we avoid. Incidentally, most new ments modular, i.e. if something changed has, it affects the entire situation at once (e.g. the new material system).
For each point it is noted which side of the manual the following applies.
To make reading even easier for you does this addendum contain its own table of contents directory and a separate index.
Michael Gable (in October 1996)
Product Manager
HALL OF HONOR
CINEMA programmers
Philip Losch, Christian Losch
AddOn programmers
Jan-Claas Dirks, Alexander Pratsch, Jürgen Schildmann
Beta testers
Sammy Fischer, Michael Giebel, Gerald Grote, Dusty Hill, Lothar Mai, Ralf Meckenhäuser, Thorsten Meyer, Michael Taubert, Michael Welter
Handbook editing
Jan M. Anton, Harald Egel
1.2 Scope of Delivery
Included with CINEMA 4D Version 4 are located:
- 1 CD ROM
- Version 2 Professional manual
- 1 manual supplement to version 3 Prof.
- this manual supplement
- 1 registration card
If your package is not complete, let us know please contact your dealer.
If you are from a previous version of CINEMA 4D update, you get
-
when updating from Vl to V4
- 1 CD ROM
- 1 manual for V2 Pro
- 1 manual supplement to V3
- 1 manual supplement to V4
-
when updating from V2 to V4
- 1 CD ROM
- 1 manual supplement to V3
- 1 manual supplement to V4
-
when updating from V3 to V4
- 1 CD ROM
- 1 manual supplement to V4
If your update package is not complete, please contact MAXON in writing Computer Ltd.
Note
When updating from version 1 of the Classic CD you with this version a new serial number, Be sure to have one new registration card at-lies.
1.3 Hardware and Software Requirements
To operate CINEMA 4D you need:
- an Amiga computer with a M068020 or a higher processor
- Operating system Amiga-OS 2 or higher
- At least 3 MB free RAM
Note
CINEMA 4D runs on all of them Amiga models with 68020 and higher.
CINEMA 4D v4 is not running on Amiga models with 68000 processor.
Graphics cards are supports.
1.4 Installation
Start the installer with a Double-click on the "Install-CINEMA-HD" Pictogram on the CINEMA CD. Further help- You can make settings for the installation directly in the Get install program.
1.5 Assistance
If you have any questions about CINEMA 4D, contact please write to:
MAXON Computer GmbH
"CINEMA 4D Amiga"
Industriestrasse 26
65760 Eschborn
Have the following information ready so that we can help you as quickly as possible:
- The version number and the date of CINEMA AD. You will receive this information from the "About" window, which you can access from the CINEMA 4D main menu.
- Your computer configuration (Amiga model, Operating system version, size of the main memory and disk, graphics and others built-in maps)
- an exact description of the problem Also read the notes in the Appendix B of this Supplement.
1.6 Performance overview of version 4
Compared to previous versions of CINEMA 4D has the following features added:
- CINEMA AD now supports this natively CyberGraphX system. No driving About more to be installed to the higher to use the color depths of CyberGraphX. Even a 16- or 24-bit workbench is from program used directly.
- CyberGraphX is not only used for image tion, but already used in the editor. After as before but can also graphics cards without CyberGraphX can be controlled.
- direct support of 256-color image shield (e.g. on A1200). use of pa lette sharing
- direct 68060 support (cyberpatcher is needed further, the speed is but up to 100% optimized)
- completely new material system
- Material previews for fast work
- asynchronous material manager
- numerous new material properties such as Ambient reflections, genlocking, additional ver fog and texture levels Antil-Anti3
- Previews of the textures used and Colours
- special metal shader creates realistic acting metals
- additive mixing of textures and colors and adjusting the intensity
- any number of materials per object
- soft shadows - even with punctiform light sources
- local path concept (optional) for simple data exchange
- Texture pool for all applications to save memory
- reading and writing of TGA images (Targa format)
- qualitatively and temporally improved antialiasing
- slide textures
- optimized wire and surface display among 256 colors
- Almost full backwards compatibility too V2/V3 and full upward compatibility too the versions on other computers
- Lens flare calculation behind transparent objects
- Colored display of objects in the editor
- Greatly improved depth of field
- Additional program "MainActor" (full version)
Chapter 2 Novelties in program
You will now gradually into the novelties and changes compared to version 3 of CINEMA 4D introduced.
The Cinema FAQs are of interest to all users (both beginners and experts). asked questions; frequently asked Questions). These are located as an AmigaGuide file in your CINEMA 4D directory.
It gives you tips on how to deal with it CINEMA 4D. You can access the file via Questions and Answers from the Important file.
Note
The Important file exists still. Also at Version4 can look after Printing of the supplement Changes have ben. Please see there after.
2.1 Working under Cybergraphics
CINEMA 4D is in the new version to a native Cybergraphics application. Cybergraphics is not required for operation, but - if available – used extensively. You can now use the 'libs:cAd.library' file Delete what used to be your interface to Cybergraphics (if the installer doesn't already has made).
In the editor and raytracer you can directly 16- and Set 24-bit modes (recommended number of colors for 16- and 24-bit screens set to 256). Since Cybergraphics under 16 and 24-bit no longer allows planar work (this is how CINEMA 4D normally works for reasons of speed), it is advisable to activate the new "Colored surface" option in the editor settings (see below). You can now at full speed under high color depths work.
A very high working speed will also less than 8 bit color depth. From 256 colors you automatically benefit from color, material and texture previews.
2.2 Editor Settings
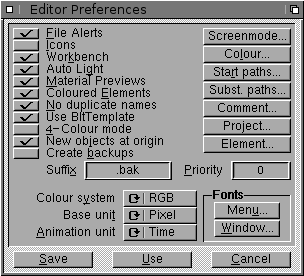
material previews
CINEMA 4D calculates a preview (preview image) for each material. That can be done on slower ones computers require quite a lot of time. In addition approx. 12KByte of memory is required for each preview image proven. If you don't need material previews or if you are working with less than 256 colors (if you have less than 256 colors, the Previews are not displayed), you can disable this option.
colored surface
CINEMA 4D draws the active and inactive ones Objects in very special colors. This option allows you to have CINEMA 4D read all to draw objects in their respective object colors in the editor. This results in several advantages and disadvantages:
- [+] CINEMA 4D runs problem-free with almost all graphics cards and all graphics modes, since bit masks are no longer used (which many graphics cards do not emulate correctly or only incompletely).
- [+] The scene display clearly improves information content.
- [-] When moving, scaling and rotating must the background (except for the grid) can be hidden.
- [-] The active object is no longer colored highlighted.
BitTemplate
This switch can be used to work faster on some graphics cards. The function becomes noticeable in the editor when moving objects or the view. We recommend activating this option under EGS and Cybergraphics. Can be used on Picasso cards the option and on retina graphics cards it should not be activated.
4 color behavior
This option forces the same editor screen appearance as on even at higher color depths the workbench. Some graphics cards have fewer problems with this.
This option has no effect if Colored Surface" is switched on.
objects at the origin
This allows you to determine the position at which objects to appear when they are created. Is the field checked, CINEMA 4D creates all objects in the Origin of the world coordinate system. Otherwise CINEMA 4D places the objects in the center of the working window. Please note that this is Object may come to rest on crooked coordinate values.
color system
Here you set whether you prefer color values per RGB or HSV system (see V2 manual p.130).
launch paths
Under "Redirection" you indicate where CINEMA 4D should store its temporary files when rendering the image. If you are low on RAM, this directory should be in a range be redirected to a hard disk.
Under 'View' enter the program that you want to use for image display. CineView is set here by default. But CineView only works with 256 colors or installed Cybergraphics system.
If you have an AMIGA without graphics card or with low color depth, you can here set the supplied program VT (ViewTek) (can be found under Tools'ViewTek'VT).
You can use the "Document..." button to access a dialog window. Here you can determine which of the possible views should be displayed when opening a new document. Preset here is "'P' (perspective view).
Additional parameters are provided for animation hand. In addition to the interpolation types for space and time you also set the animation on length and the frame rate. New documents are then opened by default with these values.
2.3 Loading times of version 1, 2 or 3 scenes
When loading the scenes from previous ones CINEMA 4D versions can load quite a bit take a long time because CINEMA 4D creates material previews when loading. Just when a hundred or there are more materials in a scene, this can take quite a long time. However, you can deactivate the creation of material previews in the editor settings (see 2.1).
Scenes with lots of materials become principal no longer read or write as quickly as in the old versions, since the material previews are stored on the hard drive in JPEG compression will. This method is the only way to ensure that the database of the scenes does not grow excessively.
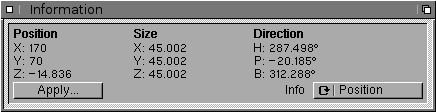
2.4 Information window
In the information window you can now also use the You can use the tab key to jump back and forth between the different input fields.
On the "Lay" page is the "Apply" field added. The entered values are only accepted when "Apply" is pressed. The keyboard shortcut for Apply is "t".
2.5 Image Formats
The image formats will continue to be the same IFF, TIF, BMP, JPG supported. The TGA image format is new and can be read in as well as can be given. Unfortunately, TIF-LZW-compressed images cannot be used for patent reasons are no longer supported.
2.6 Light source
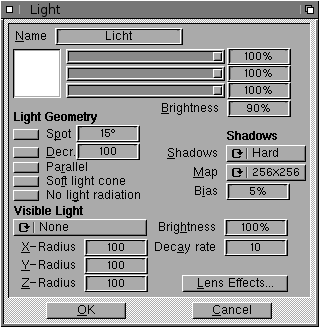
the shade
Here you can specify whether the light source at the image calculation casts shadows or not. CINEMA 4D knows two different types of shadows.:
The hard one traditionally included in raytracers Shadow ('Hard') requires the Raytracer to Calculation. Since this involves many additional rays have to be calculated, this method costs money quite a lot of computing time. Hard shadows are of particular interest for technical illustrations. In natural-looking images, they look rather unrealistic, because in nature only rarely Find drop shadows with exact and sharp shadow boundary.
In reality, objects - whether they are trees in nature or a vase in a room - from several partly extended light sources illuminated. The result is a smooth transition from light to shadow. That soft edge (Umbra) can CINEMA 4D with so-called Simulate shadowmaps ('soft'). These are images of the scene as seen from a light source. In you are all visible from the light source Objects, i.e. all illuminated objects are recorded. When calculating the image, this can be used Map to quickly determine whether an object is in the shadow of the light source or not.
A big advantage of this method is the high calculation speed and the natural appearance. But the disadvantages should not be concealed either will. Additional memory is required depending on the size of the shadow map. So go don't be too wasteful with this option around. As a rule, it is sufficient if only one light source casts shadows. Two to three additional light sources serve as a brightener or for setting of highlights (highlights). Soft shadows cannot map transparencies either. For the window glass of a church for example, you have to resort to hard shadows.
shadow map
Allows you to change the size of the shadowmap determine the soft shadow. The bigger you choose the format, the more precise the soft will be shadow calculated. At the same time, it also becomes less stretched, i.e., the transition from light to shadow narrows.
You should choose larger formats, especially when it comes to the richness of detail in the shadow arrives, or when the light source is far away from the scene. Because then the objects from the point of view of the light source only very small and it becomes high accuracy for precise shadow needed.
Small formats are always useful when It's not about accuracy, it's about the shadow impression itself.
light map
An option not present in this dialog is, for the sake of completeness, it should nevertheless be listed: these are so-called light maps. A light map is created by the light source is assigned a texture with transparent material. The light color will then filtered through texture — just like one Slide projector colored the light through a slide will. You can even have any per light source many light maps awarded! This allows you produce important visual effects. For example, the shade of a blind without actual (and time-consuming) shadow calculation as a result be simulated that the light source a black and white striped light map assigned will.
Lens effects are also behind recently transparent objects calculated. This can you can create very atmospheric animations, putting, for example, a light source behind you colored glass disappears.
2.7 Camera
The operation and appearance of the camera Dialogs hasn't changed, but here has done something "below the surface": the depth of field is now calculated with different algorithms, which increases the quality enormously will. Banding in blurred images is now a thing of the past.
2.8 Forward/Backward Compatibility
The upward compatibility of all scene, object and material data is guaranteed. There is only a place where the information from the old version cannot be carried over: at a Texture or material track in the timeline of Version 2 or 3 Professional will skip the sequence and key data. This was required due to merged material and texture tracks.
However, this opens up new possibilities such as real material morphing, which was previously not possible.
The downward compatibility of all scene, object and material data is also guaranteed. She can scenes written with version 4 were created directly in CINEMA 4D version 2 or 3 invite! Only the animation information and all advanced material and texture capabilities remain reserved for the current version.
MagicLink is still in the current Version 3.2 since there have been no changes.
2.9 Material Morphing
CINEMA 4D now masters real material Morphing, i.e. you can insert a material directly into blend another even if the materials contain different textures.
2.10 Local texture concept
With the current version 4, CINEMA AD introduced the so-called "local texture concept". Everyone who works with it saves enormously a lot of work when processing the data other operating systems.
The basic idea of this concept is that all texture paths only have a simple name and not a complete path name is specified. Instead of "dh0:pictures/cinema 4d/holzleiche.tif" you just use "eiche.tf". CINEMA 4D When loading the textures, first look in the scene directory, then in the "Tex" subdirectory the scene and finally in the replacement paths after. The editor supports you extensively, by automatically stripping away pathnames from these "known" directories. So if you want to use a new texture, it's a good idea to put it in the tex folder first of the scene and only then the texture to select. The effort is worth it! If you want to pass the scene on to someone else for rendering, you just have to take the scene folder and pass it on. Otherwise begins the tedious search for in the scene textures used.
A small downside to this method is also said to be should not be concealed: More storage space is required on the hard disk, since some Textures are present several times in scene directories. That's why we're still offering it Working the old way.
You can also save images from local Benefit from the texture concept by simply entering a name without specifying a path as the storage path for an image. The picture will then automatically stored in the scene directory.
If you want to keep scenes portable, it's a good idea to give all textures the format-specific suffixes (e.g. ""TIF" for the Tagged Image Format or "IFF" for the Interchange File Format). Under no circumstances should endings with more than three letters such as "HAM8" (Windows says hello). All Umlauts such as Ä,Ö,U,ß etc. must be deleted without replacement, as many file systems and networks still cause problems with this.
2.11 Self-configured menus
For version 2 and 3 there have been several small changes or additions to the menu structure. You can read about how to configure your own menus in the V3 addendum from page 59 in appendix A. The CINEMA 4D "Doc" directory already contains the original configurations for menus and keyboard shortcuts.
There have been changes to these command numbers:
| 1026 | Doesn't exist anymore and will read over |
| 1094 | The shortcut for the magnets was developed by AMIGA-M in AMIGA B changes |
| 1135 | Exists since version 3 (inverse kinematics) |
| 1136 | New in version 4 (material manager). shortcut: AMIGA M |
| 1137 | New in Version 4 (Material/New) |
| 1138 | New in Version 4 (material/to be uploaded) |
| 1139 | New in Version 4 (Material/Save As) |
| 1140 | New in Version 4 (Material/Save All As) |
| 1141 | New in Version 4 (Material/editing) |
| 1142 | New in Version 4 (Material/Assign) |
| 1143 | New in Version 4 (Material/Name) |
| 1144 | New in Version 4 (Material/Duplicate) |
| 1145 | New in Version 4 (Material/Delete) |
| 1146 | New in Version 4 (Material/Calculate) |
| 1147 | New in Version 4 (Material/Calculate All) |
| 1148 | New in Version 4 (Material/Unused) |
| 1149 | New in Version 4 (Material/Delete Duplicates) |
| 1150 | New in Version 4 (Material/Texture Paths) |
| 1151 | New in Version 4 (Material/information) |
| 1538 | New in Version 4 (Apply in info window). shortcut: T |
Note
From now on the file in ENVARC:Cinema must be called "Menu4.prefs" (no longer "Menu.prefs")
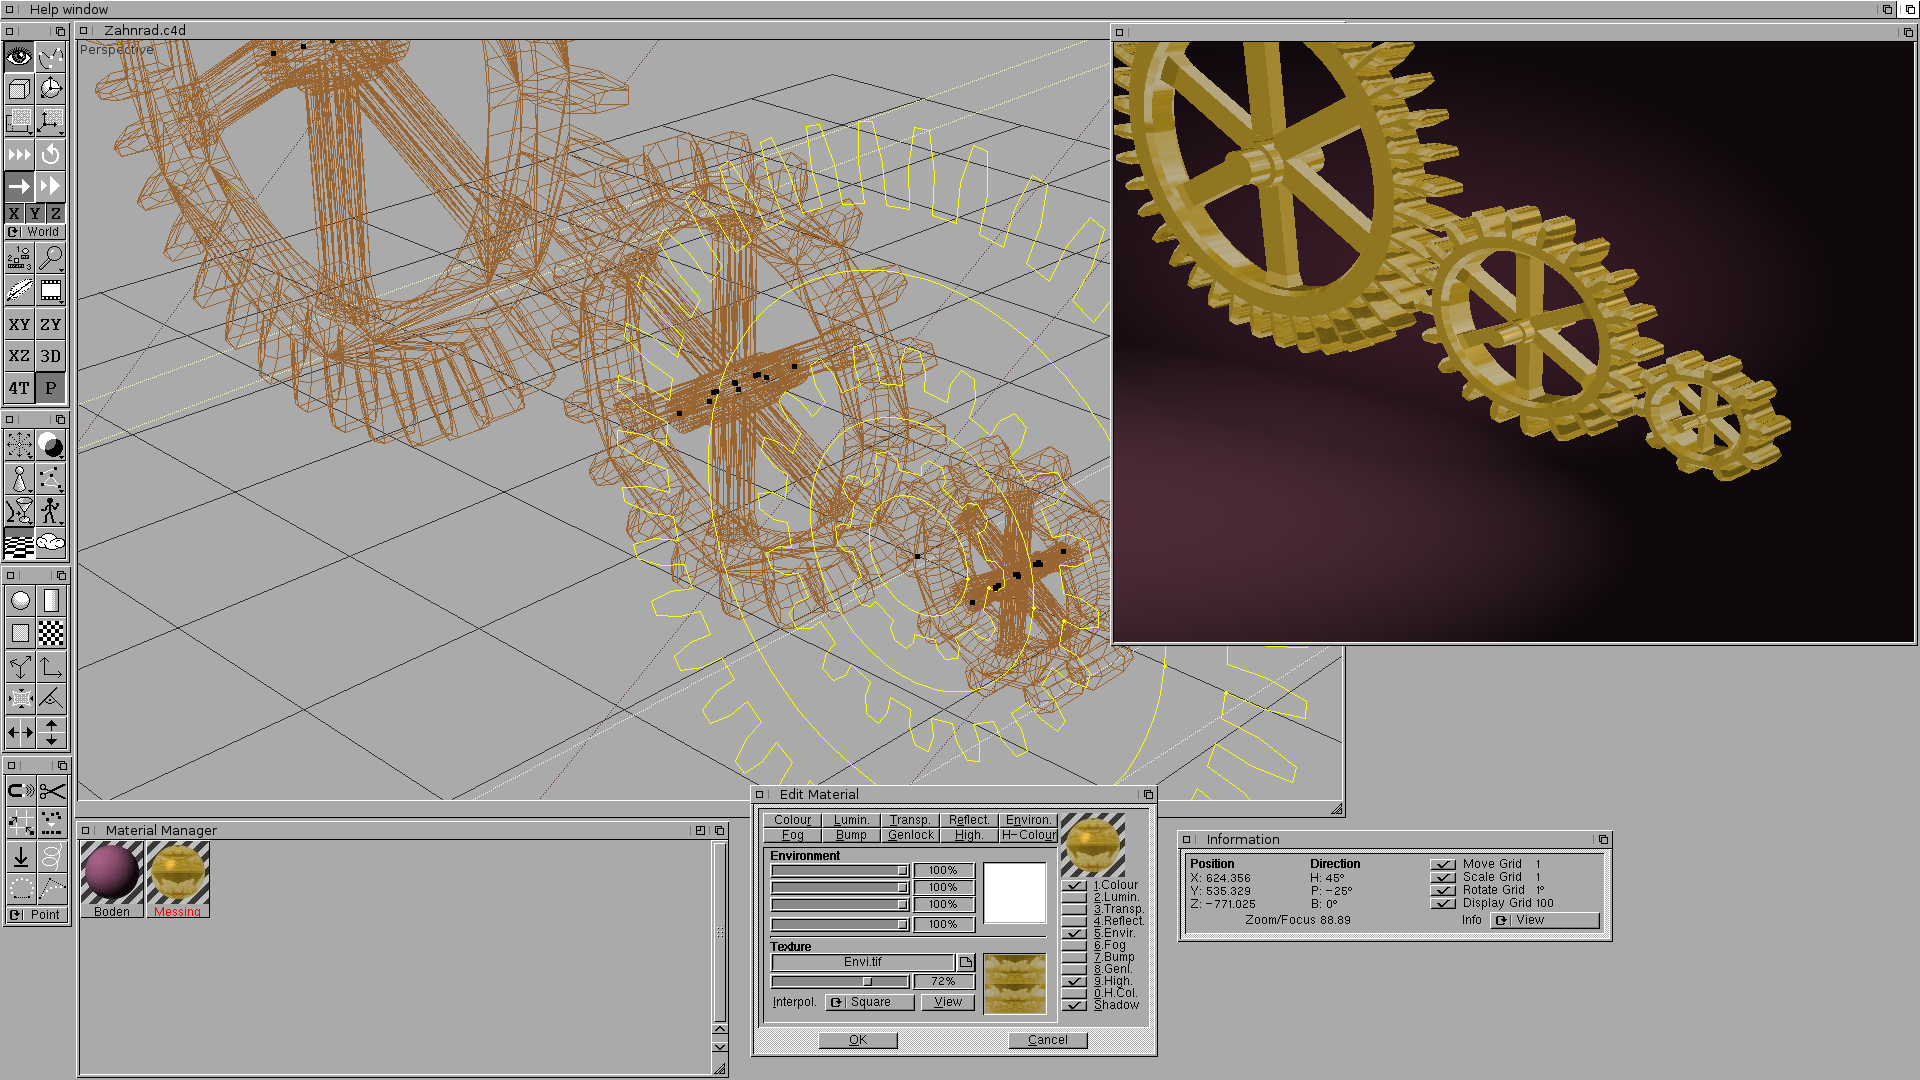
Chapter 3 The image calculation
The image calculation window has the same appearance for all calculation modes (wireframe, surface display, scanline or raytracing). However, depending on the mode, some points cannot be selected or have no effect (e.g. break in the wireframe calculation).
The settings window is divided into four areas, which are individually in the form of tabs can be selected with the mouse in the top line. These are discussed on the following pages.
There are three fields at the bottom of the window.
- "Cancel" closes the window. Any settings made will be lost.
- "Use" closes the window, but remembers the set values. Then they can e.g. be secured.
- "Calculate" finally starts the calculation of a scene with the set parameters.
3.1 General settings
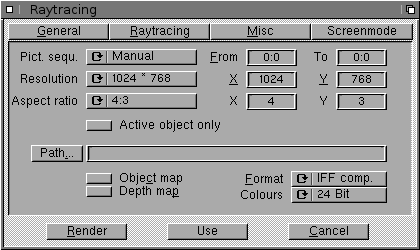
image sequence
With the leaves icon you can choose whether only the image currently visible in the perspective should be calculated (,"'This image') or a complete animation ("All pictures").
Alternatively, you can create your own image sequence, ie specify a portion of an animation that should be calculated. To do this, select "Manual". You can then enter the "From" fields and "To" enter the desired values will.
Note
"From" and "To" are good for interrupted calculation of an animation.
Make a note of the number of the last calculated and completely saved image. Enter the next number in the "from" field when calculating further.
resolution
Set the desired image size here. With the "Manual" option you can also use any other resolution instead of a pre-defined one input. The popular video formats are direct listed in the list.
aspect ratio
Particular attention in the development of CINEMA 4D has the correct output of dedicated to calculated images. An important concept here is the aspect ratio. There is that Ratio of visible width to visible height of the monitor image. Normally it is always 4:3. If the aspect ratio is not taken into account, circles on the screen are output as ellipses. Some monitors for example have on the right and left margin Stripes so that the aspect ratio of 4:3 is not more true.
Once this value is set correctly, there no more distortions in CINEMA 4D. She can here between a separate manual value (e.g. for output on a slide recorder) and the preset value for the monitor.
Active object only
This option only calculates the object active in the editor.
path
Enter the storage path under which the calculated images are to be saved. A simple name specification is also sufficient path, then CINEMA 4D automatically saves in the list of scenes. Leave an animation calculate is sent to the name of the calculated A four-digit image number is appended to the image (e.g. "Image0021.tf").
Create object map
For each point of a calculated image, an object map contains the information from which object is covered by one image pixel. For this purpose, per created a new file with the extension ".om". With the help of the object maps, diverse Post-processing effects are used.
Create depth map
A depth map contains information about the distance of each point in a calculated image from the camera.
A new file with the extension ".dm" is created for each image. Using the depth maps various post-processing effects can be used.
Note
Depth maps get the ".dm" extension
Object maps get the ".om" extension
Colours
Set here the color depth in which the calculated image should be saved. CINEMA Internally, 4D always works with a color depth of 24 bits and calculates the image to the one you want color depth with highly optimized algorithms.
When downsampling to 8 bits (256 colors) you can also decide whether that image is to be dithered. If you activate dithering, a color transition caused by the reduced number of colors is caused by the mixing two adjacent colors solved. But this is no real mixing like mixing two paint pots, but a mixing, as is done with newspapers. The different shades of grey come there namely by different numbers small black and white dots.
Blending removes the layers of paint, but the image becomes grainier.
format
CINEMA 4D supports a large number of common still image formats. The compressed image formats need to be saved longer than the uncompressed image formats. Especially with animations, where every ounce counts Time matters, this can weigh quite heavily fall. However, significantly less storage space is used on the hard disk.
With the "JPEG" format, you can choose between three quality levels:
- [-] bad quality, good compression
- [o] medium quality, medium compression
- [+] good quality, bad compression
3.2 Raytracing Options
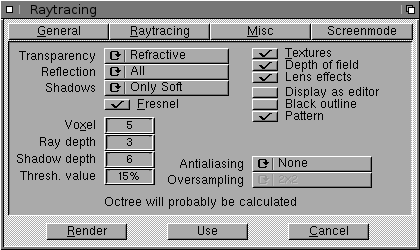
transparency
If you choose this setting, "None" transparencies will be calculated in the image. "Without refraction" means that all transparent materials are rendered, but without theirs, if any set refractive index. Finally, “With Refraction” activates the highest and most lifelike Step.
Please note that the scanline mode is on the 'Without Refraction' level is limited. For the For an accurate representation of glass, you must use the ray tracer and activate the "With refraction" option here. The processing time for an image increases due to the refraction of light. Incidentally, it does not cost any computing time if “With Refraction is set, but no refractive materials have been defined in the scene.
reflection
With the "Soil+Sky" option you achieve, that the scanline algorithm is reflections of Ground and sky calculated on the surfaces of specular objects. This function requires hardly any computing time and is therefore at time-critical projects a good alternative to ray tracing. It is often sufficient for realistic scenes.
Reflections of other objects on the surface of an object are only with the option "Everything" shown. However, you can only go with be calculated by the ray tracer.
As with everything in CINEMA 4D, the reflections have been programmed adaptively so that you only then have to reckon with higher computing times in the scene if it is actually reflective Materials happen, but not if you only increase this setting.
the shade
Here you can set whether the image calculation should be done with shadow calculation. the shade gives the scene greater plasticity. Shadowless scenes often appear "flat".
The scanline mode “only” masters the soft ones The shade. However, since this type of shadow is extremely fast is calculated and is also very realistic (often more realistic than hard shadows!), she is in everyone rule sufficient.
Only if you need hard and exact shadows should you use the "Soft+Hard" option in conjunction with the ray tracer. Since then for the shadow calculation additional rays need to be calculated, the image calculation possibly much slower.
However, there are also advantages of the hard shadow: Since it is calculated mathematically exactly, there will never be any artifacts in the picture.
When calculating the soft shadow, the scene is displayed in a so-called light map. For reasons of storage space, this has to be in the Usually a maximum size of 256x256 pixels and therefore a limited resolution. Thereby it can happen during the animation that soft Shadows on small details in brightness fluctuate - which unfortunately in principle only by a higher resolution can be eliminated. CINEMA 4D therefore offers you four different sizes in the light settings.
CINEMA 4D is one of the very first programs that the soft shadow not only with spotlights, but also for point light sources. To six light maps are cubic around the light source placed around. There may be minor shadow anomalies at the corners and edges. However, this can easily be remedied by, for example, aligning the light source with its Z-axis on the scene.
Fresnel
A disabled Fresnel option causes the entered for transparency and mirroring Values are used regardless of the viewing angle. Otherwise, the angle becomes Determination of transparency and mirroring used.
For example, if you look straight through a pane of glass, you will see that the Glass pane lets almost all light through and practically does not reflect. On the other hand, look at the glass pane (or a water surface), then the entire environment is reflected in it, without the underlying objects being visible. The distribution of Transparency and reflection changes between stepless in these two viewing positions.
voxels
Here you can set in how many voxels the entire scene is to be subdivided. Common values are between 4 and 8 divisions.
The more memory you have, the higher values you can use because of memory requirements increases approximately with the third power of the subdivisions.
In principle, the image calculation is faster becomes, the more voxels are present. Simultaneously but increases not only the memory requirement but also the Time required for entering the objects in the voxels on. For every scene there is an optimal one voxel level for which the total time is minimal will. In most scenes, this minimum is at a voxel level of 5 to 7, so that a Increasing the voxel level not necessarily one improvement results.
If you are not sure which value to enter, enter the value 6. This Value still needed even with complex scenes relatively little memory. You can always later try a higher value.
For small (in size) scenes, you can use the Decrease voxel value. Larger, spatially compact scenes are the fastest with Voxel level 6 or 7 calculated. The more extensive and more scattered a scene is built up, the higher the voxel level must be chosen.
If you raytrace animations, you can save enormous time by combining a typical frame from the animation sequence with different Try voxel levels.
beam depth
When the ray tracer casts a ray into the scene sends, this is - depending on which Material it hits — refracted and reflected. For certain arrangements of surfaces, for example two mirrors facing each other can happen that a ray infinitely often between reflected back and forth in the two mirrors. The raytracer would never do that with the calculation of the picture to be finished. To prevent this, you can use "Beam Depth" to set the maximum number of reflected or refracted rays.
You can through the skillful use of "Beam depth'" also the calculation time for that limit image. Often only the first reflections and refractions are interesting. More rays change the picture only slightly, consume but a disproportionate amount of computing time.
A calculation depth of 1 means that after the Impingement of a ray sent into the scene the calculation is aborted. Reflections and transparency are therefore not visible.
A calculation depth of 2 means that after the Impact of the first ray on a surface another ray is traced or calculated for transparency and reflection. The greater the computing depth, the wider it becomes traces and calculates the rays into the scene.
shadow depth
The same applies to testing whether a surface point is in the shadow of another object for the beam depth (see above). This test is done by additional shadow rays, which of of the surface towards the light source.
With these settings you specify that only for visual rays with the maximum depth given here shadow is calculated. For example, lowering the value to 2 for all mirrored, transparent and broken Beams no longer calculate shadows.
threshold
You can use this value to optimize the computing time. Especially in complex scenes with many reflective and transparent surfaces 90% of calculated rays less than 10% contributes to the overall image brightness and color. At a threshold value of e.g. 15%, the branching of the rays stops as soon as their brightness falls below this critical value.
But if you consciously calculate all the rays simply enter a value here from 0% on.
textures
Here you can set whether the scanline and ray tracing algorithm textures shown should be. With a renunciation of textures the image is calculated faster and the textures do not have to be kept in memory. It but depending on the scene, there is a lot of realism lost.
depth of field
If you have set depth of field for one or more cameras, it will be calculated with the depth of field option switched on.
Notice that this effect follows the normal image calculation is generated and is therefore not immediately visible.
lens flares
Provided you have one or more light sources If you have set lens effects, these will be displayed calculated with the lens effects option turned on.
Notice that this effect follows the normal image calculation is generated and is therefore not immediately visible.
Display like editor
This option is for wireframe only. When you activate them, objects in wireframe drawn with the same reduction level as in the editor. Otherwise CINEMA 4D also draws the objects completely all their lines.
Black border
This option is only responsible for the surface display. If it is switched on, all areas - regardless of their color - are shown with a black border (outline). This improves the spatial orientation and makes the surfaces stand out better from neighboring surfaces or the background.
template
This option is only responsible for the surface display. If it is activated, additional colors are apparently created from the existing ones, by mixing adjacent colors.
antialiasing
Because an image always consists of a number of pixels composed is, it has a coarse-grained Structure, which is all the more noticeable the lower the resolution is. This grain can be seen particularly at the edges of surfaces, where instead of a straight edge there are nothing but small steps (the individual pixels) are visible. This phenomenon is called aliasing
To eliminate it, CINEMA 4D offers you the "Antialiasing" setting. No antialiasing is calculated for "None".
- "Edge" leads on all object and surface edges antialiasing through. This will make the ugly ones Fixed jagged edges on freestanding edges.
- "Edge + Color" uses the color difference of a pixel to its own as an additional criterion neighboring pixels. If it exceeds a certain value, the anti-aliasing process comes into action.
- "Always" performs full antialiasing in principle through.
oversampling
Here you set how many beams (maximum) have to be calculated additionally for a pixel calculated with antialiasing. If you have set "Always", for example "3x3" actually needs nine times the computing time! Therefore suitable
- "Always" only for the highest quality standards.
- "Kante" and "Kante +" cut much better here color”. The latter setting delivers almost identical results to "Always", but only takes a fraction of the calculation time.
It has been shown that it makes more sense, rather a select higher oversampling than "Always" set. Particularly suitable for high image quality requirements and still low render times is the setting "Edge+Color" in combination with the oversampling factors "3x3" or "4x4". These are just for animations Settings optimal.
3.3 Other settings
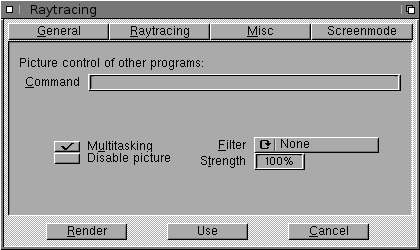
command
Once the images have been calculated and saved, you can forward them directly to other programs. This can be e.g. painting or other image editing programs.
Enter a corresponding one in the input field CLI command. You can also call an ARexx program.
Instead of a name for the CINEMA 4D image, enter $image.
Examples:
-
C4D:VT $imageFor each calculated image, ViewTek starts and displays it.
-
c:execute t:script $imageand the file "T:Script"
.key arg
echo >CON: 0/0/200/200/Output/WAIT/CLOSE <arg>
displays the file name for each calculated image in a shell window.
-
c:echo $imageonly works if CINEMA 4D or the Raytracer was started from a shell. Otherwise, no output option is available.
multitasking
If many programs are running at the same time in the Amiga's multitasking mode, the speed of the individual programs is slowed down considerably. You can activate this option so that CINEMA 4D still runs at full speed. While multitasking is turned off, you cannot move the mouse, nor do keystrokes have any effect. However, so that you can cancel the image calculation anyway, multitasking is briefly switched on again after each calculated line of the image. During this time you can stop the image calculation.
The abort is even quicker if you press the key.
turn off the image
You can achieve a small increase in speed when calculating the image on AMIGA models without a graphics card if you activate the "Turn off image" option. The screen is then set to black for the duration of the calculation. Because the computer no longer needs any computing time to display the image, the image is calculated slightly faster. However, this does not apply to the screen modes of graphics cards. The option has no effect here.
filter
You can apply built-in post-processing filters to the calculated image.
For example, the blurr causes each pixel to be compared with its neighbors, resulting in a slight blur. This is less suitable for still images; it shows its strength in the animation calculation. Computer animation often exhibits undesirable jitter at object edges.
With the soft focus, this is greatly reduced. The blurriness, on the other hand, is not noticeable in moving images and is therefore not disturbing.
Where the blur cannot be used, the mid filter comes into play. It filters unsightly peaks (e.g. white grainy pixels) out of the image. The middle filter should always be switched on for final calculations.
The edge filter emphasizes transitions in the image in front. In this way, the edges are reinforced many times over. The filter is irrelevant in practice. Instead, it finds application in the artistic field.
strength
Set here how strong an image filter should have an effect.
3.4 Image Mode
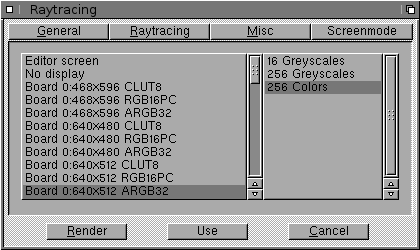
On this page you set the screen resolution for the image to be calculated. The display is independent of the graphic to be saved.
On the left side you will be offered a list of all the resolutions integrated into your Amiga.
On the right side you are presented with another list of possible color numbers. Among other things, we have avoided nonsensical values for reasons of clarity, e.g. does ray tracing participate? colors make no sense..
Two special screen modes deserve special attention as they are not implemented in the Amiga preferences.
"Editor Screen" renders your scene in a window on the screen where the CINEMA 4D Editor is running. All information regarding resolution and number of colors are taken from the values for this screen. Therefore there are no entries in the color list.
A prerequisite for image calculation on the editor screen is that it has a color depth of at least 8 bits (=256 colors). You can of course set to a Cybergraphics screen with 24-bit color depth and enjoy true colors on your editor screen.
Chapter 4 A new material concept is introduced
The new version 4 of CINEMA 4D introduces profound changes when working with textures and materials. Nevertheless, an attempt was made to retain the previous concepts as far as possible.
Until now, the principle that an object had exactly one texture with one material always applied in CINEMA 4D. Now you can assign any number of materials to an object, each with different textures (geometries) that overlap, cover, etc. For example, you can easily apply a label to a soda bottle made of the material "glass". To do this, simply create two textures; the first with the material "Glass" and the second with the material "Label". Since the "Label" material was created last, it has a higher priority than the "Glass" material (you can specify exactly which material covers which distribution). CINEMA 4D calculates the label material at all points where the label is placed (multiple tiling was switched off for the label so that it only appears once). Otherwise, the “glass” underneath comes to the fore.
You can apply any number of materials to an object. The validity of a material at a location is always determined by the texture geometry. In addition, you can use so-called "genlocking" to reveal the underlying materials. To do this, you can specify a genlock texture that CINEMA 4D uses to "knock out" specific locations on a material surface. At these points you can then see the underlying material. If none exists, the object is invisible at this point. For example, you can create the framework of a crane by texturing a simple cube with multiple genlock textures.
Objects are no longer assigned texture geometries when they are created. This used to be the case because an object only had a single texture geometry with only one material. Under the new system, texture is not assigned to the object until new texture geometry is created. You can do this by selecting 'Select material' or 'Edit material'. The first time, CINEMA 4D determines that there is no texture geometry and automatically creates a new one. After that, "Select material" and "Edit material" behave as before: both refer to the material of the currently selected texture.
You can create a new texture at any time by clicking the Texture or Texture Axis tool in the Editor and choosing Create New from the pop-up menu. CINEMA 4D then creates a new texture.
In this pop-up menu, a texture is highlighted in bold. It's the active texture. You can activate a different texture simply by selecting the entry in the popup. You can immediately see how the material data changes in the information window.
For all functions of the Extra'Texture menu, CINEMA 4D refers to the currently active texture. For example, if you set a "Surface Texture", this refers to the currently active texture. All other textures of an object are not affected.
Textures are reordered using the Move Up and Move Down popup entries. The active texture is shifted up or down by one entry. The higher a texture is listed, the higher priority it has in the calculation.
A texture can be removed again via the "Delete" pop-up entry.
If you want to switch from "Edit Texture Axes" to "Edit Texture" or vice versa, you don't have to select the same texture in the popup every time. A simple, short click on the respective symbol is sufficient. The previously active texture remains activated.
The new material system introduces certain changes in animation: each object now has four texture tracks, allowing an object's multiple textures and materials to be animated.
The new entry "Material Manager" (keyboard shortcut AMIGA-M) can be found in the window menu, with which an asynchronous material processing can be opened. The material manager is described in detail in the next chapter.
The material previews are only displayed in the material manager if the editor works with at least 256 colors.
The Material Manager is an optional — albeit useful — tool. All things can still be done without a material manager.
Chapter 5 The material manager
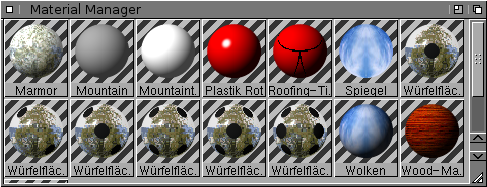
In this manager, all the materials in a document are displayed in alphabetical order with their names and a preview image. If a material name is too long, it is shortened with a period.
A material image is represented as a hemisphere on a striped background. Depending on the setting of the material parameters, you get a very good impression of how a material will later appear on the object.
When you activate an object, its materials used are drawn indented with a border. You can see immediately which materials are assigned to the object.
If a texture is active, only the material of that texture is drawn indented.
You can activate a material with the mouse or the keyboard. Activation is indicated by a red material name. All menu functions always refer to the activated material.
It is activated by a single click on the material or by using the cursor keys.
You can edit the active material by double-clicking.
The Material Manager functions can be accessed either from the "Material" menu or from the Material Manager pop-up menu that appears when you right-click.
1 new
Creates a new material with default values. The new material corresponds to the default material of CINEMA 4D.
2 Add
Loads saved materials. For example, you can also load materials from another scene.
However, you have to be careful with textures: CINEMA 4D expects that all textures are in the local scene directory, in a scene subdirectory "Tex" or in one of the ten alternative path directories. This is probably not the case when loading the materials from another scene. In this case, copy the textures into the directory of the scene you just edited.
3 Save active material as
Saves the active material to disk.
4 Save all materials as
Saves all materials in the active document to a file on disk. For example, you can create material libraries.
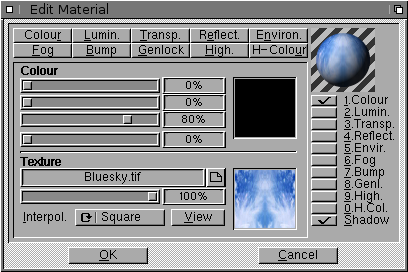
5 edit
This feature allows you to fully edit and change a single material. The CINEMA 4D material system offers you unlimited possibilities. At the same time - despite the huge number of parameters - it is extremely easy to use.
On each dialog page is the preview image, which consists of a sphere illuminated by a light source. There you can immediately see interactively how your parameters affect you.
All parameters are divided into ten groups (dialog pages). These ten groups can be activated or deactivated as a whole with the tick under the preview image. The operation of the ten groups is very similar, which is why the same control elements are also in the same place. "Shadow" is not a separate group, it indicates whether the material can receive shadows. For example, in a scene you can only set "shadow" for the floor, which means that no shadows have to be calculated for all other objects. This saves considerable computing time.
However, if you want to calculate an entire image without shadows, set this globally in the image settings. The Shadow option is not intended for this purpose.
You can set a "color" on many pages. The sliders behave the way you configured them in the preferences: You can choose between the HSV and the RGB color system.
| Group | Meaning |
|---|---|
| colour | surface color |
| to shine | Luminous colour |
| transparency | transparency |
| reflection | mirror ability |
| Surroundings | Ambient reflection (extremely fast when calculating) |
| fog | fog effect |
| relief | surface roughness |
| genlocking | "Non-existence" of the material at certain points |
| shine | highlight |
| gloss color | color of the highlight |
Below the three color sliders is another one that allows you to control the brightness of the color. Although this controller is redundant in the HSV system, it is absolutely necessary in the RGB system.
To the right of the slider you can see the overall color. There is also a field there with which you can open the color dialog of the respective operating system.
If a group has a "Texture" field, you can set a two-dimensional image as the texture there. CINEMA AD reads JPEG, IFF, TIFF (unpacked), BMP and TGA formats.
Below that is a texture brightness slider; to the right you can see a preview image of the texture.
If a group has both "Color" and "Texture" fields, then the color is either multiplied (Environment side only) or added to (all other sides) the texture(color).
With "Interpol." you can set how the points of a texture are interpolated. With "None" the pixels of a texture are used directly. This method is extremely fast, but is unsuitable for small-area textures and leads to very restless, gritty images.
"Square" is the default default interpolation. Here not only a pixel is considered, but also its neighbors. This results in smooth transitions between the texture pixels. The 'square' interpolation is still calculated very quickly though.
"Circle" interpolation is very similar to "square" interpolation. The texture pixels have a rounded area of influence, so that a more natural image results when the texture is greatly enlarged.
You can achieve even better effects with the interpolations “Antil” to “Anti3”. At the same time, these interpolation modes create an anti-aliasing effect, so that high-quality texture images are calculated which — important for animations — are hardly ever restless and flicker. The softness of the sampling increases from Antil to Anti3 — but so does the computing time. Anti3 needs a multiple of the computing time of Antil, but also smoothes all edges of an image.
Let's hold on:
-
“Square” is required most often
-
"No" interpolation is only interesting if you want to save computing time.
-
For small-area textures that cover a larger part of the screen, the "Circle" interpolation is particularly suitable
-
"Antil" is suitable for animations and bump mapping -— if the computing time allows it
-
"Anti2" and "Anti3" are particularly useful for smaller textures whose coarse-grained pixel structure is to be smoothed.
color page
Here you can determine the color of the material. The color component of the "texture" is added to the "color". Therefore, adjust the brightness of both parts so that together they are not higher than 100%, otherwise the material appears unnaturally bright.
Luminance Page
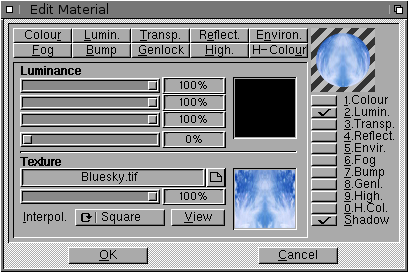
you can specify the lighting-independent base color of the material and an optional texture map. The proportions of "color" and "texture" are added.
Luminous materials are particularly suitable for simulating neon lettering or for objects that appear to glow themselves.
transparency page
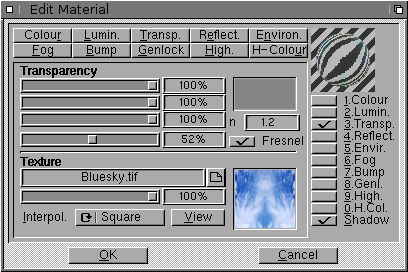
Here you can determine the transparency of the material. The shares of "color" and "texture" are added. Therefore, adjust the brightness of both parts so that together they are never higher than 100%.
The transparency acts like a light filter. Black lets no light through, pure white lets all light through.
You can directly compare a transparency texture to a slide. Red areas of the slide allow only red light to pass through, while white areas allow all light to shine through. In black areas, no light penetrates through the slide.
Light sources use transparent materials as light maps. Applying a transparent texture to a light source filters the light in color. For example, you can use this effect to create the shadows of a blind.
You can also specify the refractive index "n" of a material for realistic simulation of glass or water. Of course, this only makes sense if the material is also transparent. Otherwise the index has no meaning. Here are some refractive indices:
| stuff | refractive index |
|---|---|
| vacuum | 1,000 |
| air | 1,000 |
| water | 1,333 |
| quartz glass | 1,458 |
| benzene | 1,501 |
| crown glass | 1,510 |
| Amber | 1,550 |
| flint glass | 1,613 |
| diamond | 2,419 |
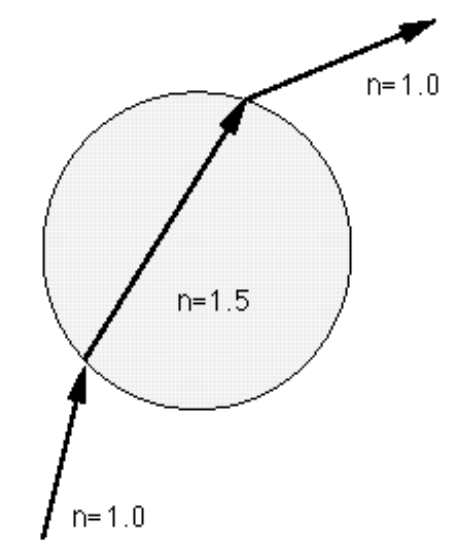
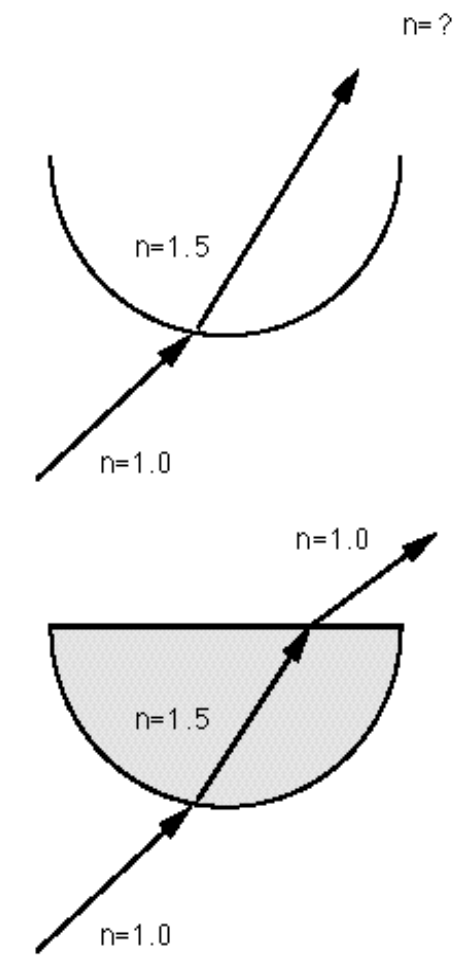
Objects that are not completely closed, such as a hemisphere or a single triangle, can lead to anomalies in the image. This is due to the way the ray tracer calculates transparency and refraction. Once a ray encounters a surface with transparency and refraction, the ray will be attenuated and deflected as it passes through the surface. The beam is now in the object and continues to run until it hits another surface of the object — this time on the exit side. There it is deflected again — just as one would expect from a refracting object, such as a glass ball.
For example, if you use an open hemisphere, the ray will enter the hemisphere; however, it may happen that it never encounters a second surface. The ray tracer then assumes that the ray is still inside the hemisphere when in fact it is long outside. So don't worry about unexpected refraction effects when using open objects, and make the objects so that they are closed. For example, you can give an open hemisphere a second wall or a lid.
When Fresnel is off, the values entered on the Transparency and Reflection pages are used regardless of the viewing angle.
Otherwise, the angle between the light beam and the surface is used to determine transparency and reflection. For example, if you look at a pane of glass, you will find that when viewed straight on, the pane of glass transmits almost all light and has practically no reflection. On the other hand, if you look at the glass pane or, for example, a lake from a flat angle, then the entire environment is reflected in it without the objects underneath being visible. The distribution of transparency and reflection changes continuously between these two viewing positions.
For example, if you specified the RGB values 80% red, 80% green and 80% blue for transparency with a refractive index of 1.5, the material is 80% transparent and 0% specular when viewed perpendicularly, and 0% transparent when viewed very flat and 80% specular. If you have also entered values greater than zero for the reflection, these are always added to the angle-dependent values.
reflection page
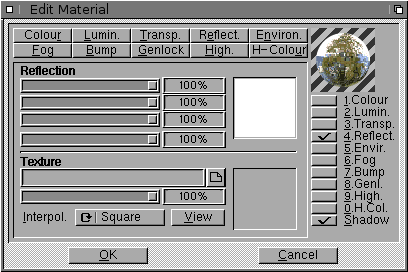
Here you can determine the reflectivity of the material. The proportions of "color" and "texture" are added.
The values specified here determine how strongly the three color components red, green and blue are reflected for the entire surface. This allows you to create very complex-looking surfaces. For example, if you use a checkered pattern of alternating black and white squares as a mirror texture, you will achieve that the surface alternates between no mirroring and 100% mirroring. This gives a tiling effect with alternating dull and specular tiles.
Environment page
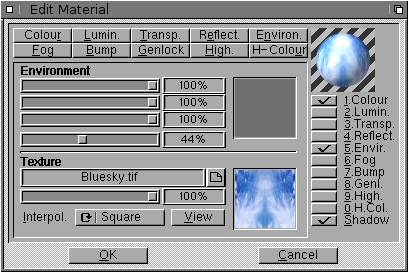
Here you can set the ambient reflection of the material. Unlike on the other pages, the proportions of “color” and “texture” are multiplied.
Ambient reflections are particularly suitable for the production of metals. Metals show smooth transitions from black to white on their surface. You can simulate this with an environment texture.
Often a scene is too empty to be able to produce natural reflections (what scene has a realistically shaped background and a lifelike horizon?). The environment texture allows you to correct this very easily.
The surrounding texture lies spherically around the object, parallel to the world axes. No ray tracing is required for environmental reflections, which means that the calculation is extremely fast.
The surrounding mirroring takes place in addition to the normal mirroring!
fog page
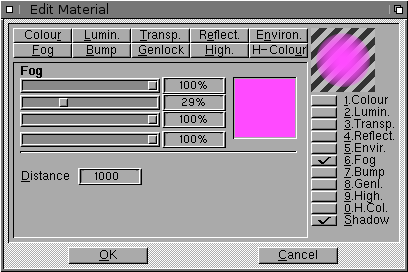
With these parameters you can simulate realistic nebulae or gas clouds. Objects made with such materials are translucent, but depending on their thickness, they somewhat attenuate the light that shines through them.
When a ray of light penetrates the fog, it is attenuated. You can set this attenuation with "Distance". The larger this value, the thinner the fog. "Distance" indicates at what distance a light beam is completely attenuated.
In addition to weakening the light, the inherent color of the nebula is added. The further you look into the nebula, the fainter objects are visible, but the nebula color becomes more and more visible. The fog color is completely mixed in at the distance specified under "Distance".
For example, if you specify a “Distance” of 500, a light beam that originally had 100% intensity only has an intensity of 50% after a distance of 250 units, and it is extinguished after a further 250 units. The shorter the distance, the thicker the fog appears. In addition, after 250 units half the fog color is added to it, after 500 units the full fog color.
You can use fog objects, for example, to simulate smoke and haze in mountain valleys or for clouds.
Fog objects should always be closed solids. Objects that are not closed can lead to physically incorrect images, since a ray of light that has entered the object no longer hits its surface a second time. The ray tracer then assumes that the light beam is still in the fog.
relief page
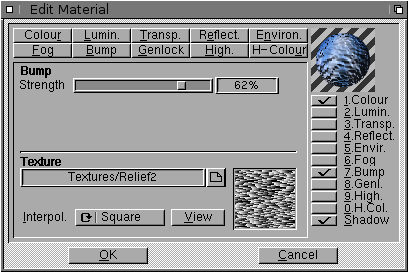
When using a relief, you must always specify a texture, since height information is calculated from the gray values of an image.
You can set the strength of the relief with the slider. This value indicates how far the normal vectors deviate from their original direction when calculating the relief. The higher the value, the rougher the surface. However, be careful with values that are too high, otherwise the material no longer looks realistic due to the large jumps in lighting. A value of 20% should be sufficient in most cases. If you move the slider to the left, you can also set negative values. Negative values swap raising and lowering.
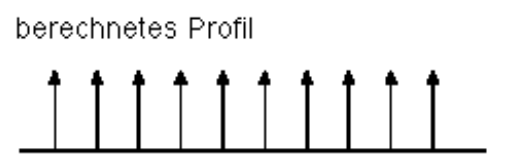
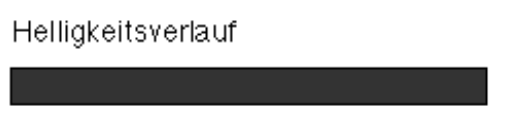
Here you can see a flat surface from the side. Since the same normal vector is used for the lighting for the entire surface, the surface has a uniform brightness. On the other hand, if you use a bump texture, CINEMA 4D interprets the brightness values of the image as height values of the surface, as you can see in the figure below.

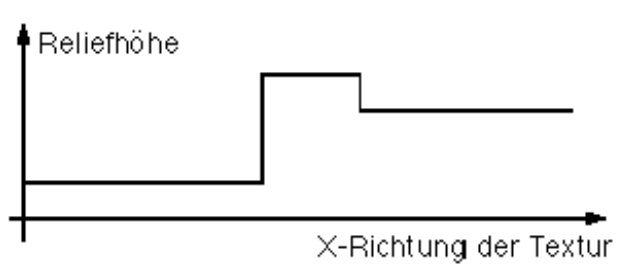
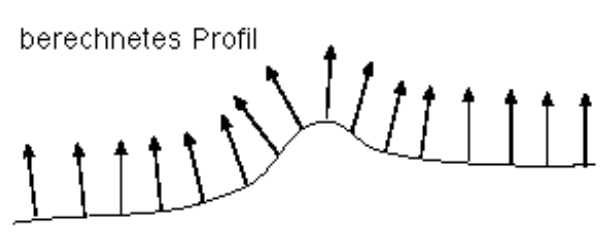

These height values are converted into a profile whose slope affects the slope of the normal vectors. Although the surface is actually smooth, an apparently three-dimensional surface with a relief-like structure is calculated due to the inclination of the normal vectors, the brightness of which is shown in the figure below.
genlocking page
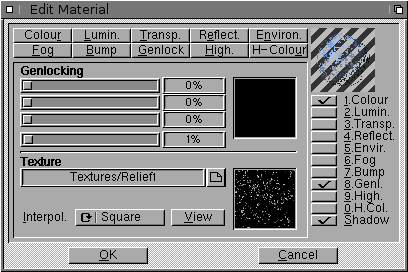
With the parameters on this page, you can selectively punch out a color range of a texture. At these points, the material is non-existent and underlying materials are revealed. This works similar to an electronic genlock device for video post-processing.
With the "color" you specify the color value that is to be punched out. The "Area" regulates how much a color may deviate from the set value in order to still be punched out.
If genlocking occurs at one point on the surface, the underlying material becomes visible. However, if the object has no underlying material, the object is not visible or does not exist at this point.
For example, if you want to use a scanned image of a tree in a scene, first activate the color option and enter the image of the tree as the color texture.
If you now calculate the image, you can see the tree on the square, but the area around the tree is not yet transparent, but e.g. blue if the scanned image had a blue sky background.
Now also activate the Genlock option and switch to the Genlock page. Set the tree texture there as well. Now simply click with the mouse on the area that you want to punch out - in our case on the blue area around the tree.
CINEMA 4D immediately sets the color sliders to this color value and punches out the sphere in the image accordingly. You should now only be able to see the tree with no surrounding background.
highlight page
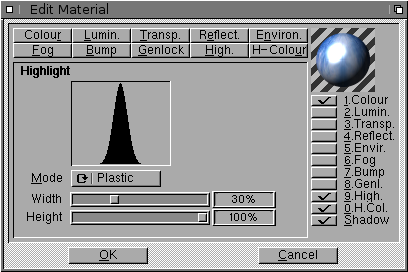
Here you can set the 'width' and 'height' of the highlight. If you want a more matte finish, set a wide and low highlight, while for a polished and glossy finish, set a narrow and high highlight.
In addition, you have the option of choosing between two lighting models for the surface:
With Plastic, the color of the highlight is independent of the material color, i.e. it usually appears white. This mode is particularly suitable for materials such as plastic, glass or wood.
With "Metal", the color of the highlight is calculated in a complicated way from the color of the material. You can use it to simulate matt metal surfaces such as silver, brass or gold very well.
Glossy Color Page
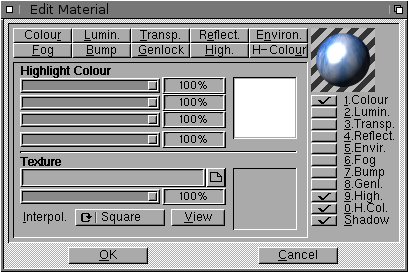
Here you can set the color of the highlight. The proportions of "color" and "texture" are added.
The overall color specified here is multiplied by the normal color of the highlight. For example, if you have a white plastic highlight, you can directly determine its color here.
6 Assign
If the active object doesn't already have a texture, a new one is created and the active material is set. Otherwise, the active material is entered for the active texture.
7 Rename
With this function you can change the name of the active material. Materials are always sorted alphabetically.
8 Duplicate
This function duplicates the active material.
9 Delete
This function deletes the active material.
10 Calculate
This function calculates the preview image of the active material.
11 Calculate all materials
This function calculates the preview images of all materials.
12 Delete unused materials
This function deletes all materials that are not assigned to any object.
13 Delete duplicate materials
This function deletes all materials that already exist in an identical form.
14 texture paths
This function is available so that you do not have to correct incorrect texture paths for each material individually.
After the call, a window appears in which you enter the new texture path. This texture path is set for all textures. For example, "dhO:Images/Backgrounds/Drawer/Pics/KingTut" becomes "Tex:KingTut" if you specified "Tex:" as the new path.
This feature is particularly useful when converting an existing scene to local texture paths. When asked for the new path, simply leave the input field empty. Thus, all path information is removed from the scene.
15 Information
This function is available so that you can determine whether a material is being used by another object or how many other objects have been assigned this material. It tells you the number of objects, including the ground and sky, that make use of the selected material.