24 KiB
Animation Tutorial
MaxonCINEMA 4D has fantastic animation possibilities. The program offers sophisticated yet easy-to-use tools for practically all areas of computer animation, be it keyframe animation, path animation, hierarchical animation, inverse kinematics, material animation, light animation or the use of special effects such as explosions. This enables you to create highly complex animations in a very short time.
The large range of functions of the animation part is usually hidden in order not to burden the user unnecessarily. Many parameters are intelligently supplemented by the program. However, if required, you have direct access to all parameters and can put the finishing touches to animations.
In contrast to the rest of the tutorial, the functions are not treated linearly in this part of the book, but are discussed according to the type of animation and the procedure for creating an animation. We decided to do this because the creation of three-dimensional computer animations places even higher demands on the user from the outset, because in addition to the three dimensions of space there is another dimension, time. Hence the naming of MaxonCINEMA 4D. The 4D stands for the three spatial dimensions plus the time dimension.
1. Tempus fugit (Time flies)
Animation means that different events, such as movement or a change in material, occur at different times and persist for a certain duration. It is therefore important to use a suitable system of units for determining points in time that is easy to understand and easy to understand.
Many editors use image units for simplicity. For example, every second of narrow film consists of 18 frames. A computer animation that later wants to output 18 frames per second must therefore calculate 18 frames for every second of film.
For one minute of film (60 seconds) that's 1080 frames. The pictures are numbered consecutively, so that the first picture gets the number OÖ and the last the number 1079. All events are now specified by frame number. For example, a movement could last from frame 1037 to frame 1045.
However, it is easy to see that this method is not very convenient. On the one hand, when the playback speed changes from, for example, 18 frames per second to 24 frames per second, the user must accept that all frame numbers will change. On the other hand, you will certainly be more familiar with the natural units of time, namely seconds and minutes, than with any abstract pictorial units. Speeds are also usually given in meters per second and not in pixels per frame.
Nevertheless, you can use both options in MaxonCINEMA 4D. In Editor Preferences you can set your preferred default unit for animation.
If you type a picture number into a text entry field, you must add the letter "B" (e.g. 1039B) so that MaxonCINEMA 4D knows that it is a picture number.
To enter a point in time, you must use extended notation. The first number indicates the minutes, the second the seconds and the last number the frames that have already passed since the beginning of the second. The following example should clarify this for you:
Let's stick to 18 frames per second. Then the time "0:20:06" means that we are at the point in time of 20 seconds and 6 frames (= 6 eighteenths of a second).
If we now switch to a playback speed of 24 frames per second, the same point in time "20:08" would mean 20 seconds and 8 frames (= 8 twenty-fourths of a second).
If you type in a value without a unit, MaxonCINEMA 4D automatically assumes that you entered the value in the animation units specified in the editor settings. A value of 12 means, for example, in the animation unit “frames” that the 12th frame is meant. If the default unit is "time", then the value 12 means that the 12th second is meant.
Note
Please note that you always add the letter “B” when entering images.
2. Basic structure
The animation in MaxonCINEMA 4D is divided into units of different sizes, which increase clarity and flexibility.
The smallest unit is the key (= key). The key designates a point in the animation where a specific action can begin or end.
For example, the first key defines the position of a car - let it be at the bottom left of the screen at time O seconds.
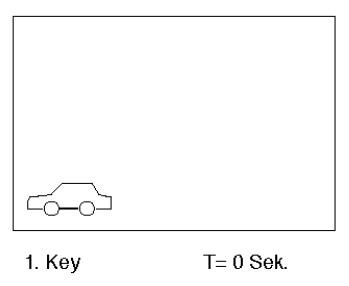
Figure 1
The second and the third key define the position of the car at time 3 and 10 seconds respectively. The car is now at the top right of the screen.
Note
MaxonCINEMA 4D begins counting frames with frame 0. This has an impact on the extended notation.
For example, if you have set a frame rate of 15 frames/second, the last frame of the 10th second is NOT at 10:00, but at 9:14.
Otherwise an image would be calculated too much, which is not desirable.
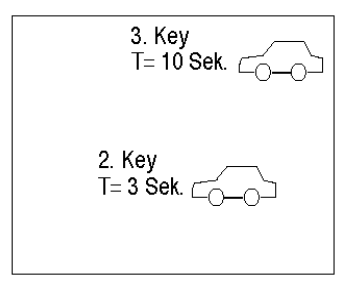
Figure 2
Using these three positions — also called key positions (in English keyframes) — MaxonCINEMA 4D can calculate the movement of the car. For this purpose, all intermediate positions between the two keys are calculated (interpolated) and displayed frame by frame (Figure 3).
The car then moves from bottom left to top right within 10 seconds in the finished animation.

Figure 3
For more complex movement sequences, however, you can also use more than just three keys. Each key then defines a vertex of a path on which an object can move (Figure 4). For such a path you can choose whether the interpolation, ie the calculation of the intermediate images, should be linear, on one of the three spline types "Cubic", "Akima", "B-Spline" or "Jump" (Fundamentals 13). .
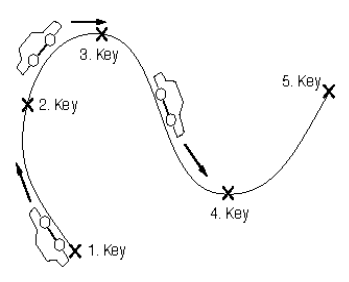
Figure 4
Of course, keys can not only specify positions, but also dimensions, angles, materials and much more. Practically all parameters of an object can be animated.
You can enter keys both numerically and by clicking on the 'Record' field in the 'Time' window. Whenever you have set a new point in time and moved the object to a new position, you can record.
When recording, the current state (position, dimensions, location, material and texture) is recorded and saved in the key. You freeze certain parts of a film, so to speak, and let the program automatically fill in the missing intermediate parts. This type of animation is therefore called keyframe animation.
Several consecutive keys of the same type (e.g. 4 keys with position data or 7 keys with material data) are combined into a sequence. A sequence is characterized by a start and end point and a type. Within this period of time, the keys define what happens. A sequence can describe, for example, the movement of a foot or the explosion of a car. A sequence can only contain keys of the same type, for example only position keys.
The animation of an object is described by one or more sequences, which can also overlap in time. For example, a car could start moving and change color in the middle of the movement, only to then explode.
Each object can have several sequences that reflect the properties of the object over time. The sum of the sequences of an object is also called the time track (track for short) in the following. All sequences are on one track. This is particularly evident when using the "Timeline" where the time tracks are graphically displayed.
3. Time frame
In MaxonCINEMA 4D you can set the time frame within which all animations run.
An animation always starts at second 0. For example, you can limit the length to 1 minute. A subsequent change is possible at any time.
You can also specify the playback speed (frame rate) for which the animation should be calculated. If you want to output the animation (with suitable equipment) to narrow film, you should use a playback speed of 18 frames per second. 24 frames per second are suitable for cinema films, while 25 frames (Europe, PAL standard) or 30 frames (America, NTSC standard) are intended for television.
However, you can also use any values such as 10 frames per second. Such low values are particularly suitable for generating a quick preview with low image quality, since correspondingly fewer images have to be calculated.
Consider: if a single picture in high quality needs 'only' 1 hour, with a playback rate of 25 frames per second, you have to let your computer calculate for a whopping 60 days uninterruptedly for 1 minute of film!
Note
You can change the playback speed at any time while creating the animation. Note, however, that when changing from a high frame rate to a low frame rate, rounding will occur. How else should you originally distribute 25 frames of a second animation to just 3 frames?
4. Keyframe animation
Keyframe animation is often not only the most effective but also the simplest of all animation options.
-
Open the "Time" window. You can find the related function in the "Window" menu.
In the "time window" there is a slide bar that you can use to set the time you are currently at. It can be adjusted from zero to the maximum length of the animation. You can set the maximum length with the "Global parameters" function from the "Key-frame" menu.
There are three different types of "arrow" symbols in the time window.
You can use the simple arrow icons to move forward or backward one frame. The slider moves automatically and the scene in the document window is rebuilt according to the new point in time.
The double arrow icons allow you to move forward or backward one full second at a time.
The symbols to the left of the "Record" symbol are used to jump to the next or last key, if this exists.
We'll start with a simple animation in which a cube should first move from the bottom left to the bottom right and then to the top right.
-
Create a new document window with a cube. Go to the "Perspective" view.
-
Set the slider to time O seconds.
-
Place the cube in the lower left corner of the documentite window.
-
Click on "Record". MaxonCINEMA 4D now saves the position of the cube at time 0 seconds.
-
Move the slider at the 8 second time point or enter 8 seconds in the 'Current time' function from the 'Keyframe' menu.
-
Now move the cube to the lower right corner and click on "Record" again. The second position is now also saved.
You will immediately see the movement path of the cube appear.
Note
In the extended notation, 09:14 indicates the end of the 10th second at a frame rate of 15 frames/second.
-
Finally set the time seconds (10 seconds is the default length of an animation at program start). Move the cube to the upper right corner and click "Record" to save the third position.
The motion path changes to a smooth curve. Cubic interpolation is preset for all sequences.
The animation is actually already finished. You can reproduce this by adjusting the slider to any time between 0 seconds and 09:14 seconds.
You will see how MaxonCINEMA 4D moves the cube to positions that are reached at the appropriate times. At the time of 4 seconds, the cube is about halfway between the 1st key and the 2nd key.
You have just created three position keys. In addition, MaxonCINEMA 4D created a sequence for the three keys that starts at time 0 seconds and ends at time 09:14 seconds (the length of the animation).
In order to be able to examine the animation, you must start one of the image calculation algorithms.
-
Right-click the 'Calculate Image' icon and select the 'SW Wireframe' algorithm. In the window, set the calculation to last from 0:0 to 09:14.
-
Click on Output and check the option "Save" on the screen output. Enter a path name under which the calculated images of the animation are to be saved, e.g. "I: Test".
-
Exit the "Output" window with "OK" and start the image calculation.
MaxonCINEMA 4D will now start calculating 150 images, which will be saved under the name 'L:Test' plus an extension consisting of the image number.
As soon as MaxonCINEMA 4D has finished the calculation, you can examine the finished animation.
-
Call the "Play" function from the "Keyframe" menu. The file selection window appears first. Select one of the calculated images (e.g. "I:Test.0000").
MaxonCINEMA 4D now opens a window in which the calculated images are played back in real time. In addition, a window similar to the time window is opened. Like a VCR, there are buttons to play the animation forward and backward.
-
Click on the "Forward" icon. The animation will now play. The cube initially moves relatively slowly from left to right, only to then suddenly move quickly from bottom to top. He has 8 seconds from the 1st key to the 2nd key, while he only has 2 seconds from the 2nd key to the 3rd key - with almost the same distance.
-
First close the playback window.
-
Access the Edit Sequence function from the Keyframe menu.
-
Here you can set separately for all sequences with "Room" how the keys are to be interpolated. Select the "Linear" interpolation type for the position sequence, restart the image calculation and view the result with "Play".
Note
MaxonCINEMA4D generates keys for an object's position, size, direction (angle), material, texture and texture axes when the "Record" icon is clicked — if the corresponding field in the "Time" window is activated.
You see that the cube is now moving in a straight line. At the point of the 2nd key there is a clear kink. Linear interpolation is suitable for hard camera pans, for example, while cubic interpolation is almost always used otherwise.
-
Set Cubic Interpolation again, and this time also set the Time field to Linear.
This time, the animation moves the cube very smoothly and very evenly from bottom left to top right. He accelerates more and more.
You have now learned how to record keys for an object and how to affect spatial and temporal interpolation.
You can find the example under the name "Tutorial 3" in the scene drawer on the hard drive.
Let's summarize:
-
With Record, the position, size, and direction of the active object at the point in time specified by the time slider are stored in keys.
-
The point in time can be set using the slider and arrow icons in the "Time" window or the "Current Time" function from the "Keyframe" menu.
-
Several keys determine an animation and are combined in sequences.
-
The type of spatial and temporal interpolation can be influenced using the "Edit sequence" function.
-
The images of an animation are generated with the display types listed under "Calculate image".
-
The calculated images are played in the "Play" window.
5. Timeline
In the previous chapter, you learned about keyframe animation, which you could use to set objects in motion. You could see the effect of the keys and sequences on the movement of the objects directly on the screen. However, you could not see the keys and sequences themselves.
Using the example from the last chapter — it comes as a ready-made file called "Tutorial 3" — you can make the sequences and keys visible by opening the "Timeline" window.
The "Timeline" window can be divided into three parts. On the left edge you can see the names of the objects in a scene. The 'perspective' camera and background are also listed. The middle area is filled with bars. They are assigned time divisions at the top.
-
Left-click once on the name "Cube". You can see how the formerly narrow field opens up and reveals more bars.
On the right side you can see all types of sequences that you can animate on an object. In addition to the familiar types for position, size, and orientation, you'll find types for animating material, texture, and special effects.
Since keys and sequences have already been created in our example using the keyframe method, you can now see them.
Note
You can compare the timeline to a sheet of music. Each key corresponds to a note, and the vertical second lines correspond to the bar lines. However, MaxonCINEMA4D does not play sounds, but animation events.
-
Operate the horizontal slider at the bottom of the window. You can use it to set the time range that is displayed in the window.
You will notice that the three sequences all range from 0 seconds to 10 seconds. There are small black dots in the sequences at 0 seconds, 8 seconds and 10 seconds. They indicate that there is a key at this point.
-
Now click with the left mouse button on the sequence that is on the "Pos." track. This sequence is now activated and you can edit it.
-
For example, call up the "Edit sequence" function. As with the keyframe animation, the corresponding window appears in which you can set the interpolation types.
-
Now activate the underlying sequence and call up the "Delete" function. The entire dimension sequence is immediately deleted.
-
Move the mouse pointer to the O seconds position on the "Size" track and click the left mouse button once. Then move the mouse pointer to the right on the same track at time 4 seconds and press the left mouse button again.
You have just created a new size sequence for the Cube object. It lasts from 0 seconds to 4 seconds.
The "Edit Key" window will now appear twice in a row. The first time the time 0 seconds is entered in connection with the current size of the object. Leave the settings as they are and click OK. MaxonCINEMA 4D now creates a new key with this data. The second time the time is entered as 4 seconds. Now resize it in half and click OK. MaxonCINEMA 4D now creates a second new key with the changed size data.
In the "Timeline" window you can now see the new sequence you created with the two keys. Now let's look at the result:
-
Get out of the timeline and calculate the animation as before.
-
Open the "Playback" window and click "Forward".
Immediately the cube begins to move from bottom left to top right again, but this time it shrinks to half its size on the stretch from left to right.
-
Now create another sequence on the "Size" track by setting the start and end points with the left mouse button as before. The starting point should be 6 seconds and the ending point should be 10 seconds. For the first key, leave all values as they are. But change the size values in the second window for the second key so that they are about three times as large.
-
Recalculate the animation and see the result in the "Play" window. This time the cube moves as usual, but it initially shrinks to half its size (due to the first sequence you created), stays that small for a while, and then grows to three times its size very quickly at the end of the animation.
The timeline is therefore mainly used to visualize the sequences and keys in chronological order. You can see very well when an event starts and if certain events overlap. You can create as many sequences as you want for any type of animation and fill them with keys.
Note
You can also find the scene complete on the hard drive under the name "Tutorial 4".
6. Material animation
The animation created in the last chapter is now to be modified in such a way that the cube changes its surface as well as its position.
-
First, call up the "Manage Materials" function and load the two materials "Plastic Yellow" and "Plastic Red".
-
In the timeline, draw a new sequence on the cube's "Material" track, ranging from 0 seconds to 10 seconds. In the window, specify the material "Plastic Yellow" for the first key and "Plastic Red" for the second key.
You have now created a sequence that tells MaxonCINEMA 4D that the "Cube" object will gradually change its material from "Plastic Yellow" to "Plastic Red" within 10 seconds.
In order to be able to view the animation in color, you must use a new type of image calculation.
-
Therefore, use the right mouse button to select the "Scanline" image calculation algorithm. Click on 'Middle Image' and check 'Save' option under 'Output'. Enter e.g. "T:Test" as the name.
-
Set the image calculation to last from time 0:0 to 09:14 and start the scanline algorithm.
MaxonCINEMA 4D now calculates 150 images, but in color and with light effects.
Unfortunately, you can no longer display these images in the "Playback" window, since MaxonCINEMA 4D normally runs on a screen with only 8 colors. Therefore, start the supplied program "AnimBuild,,.
-
After starting the program, first enter the name that the finished animation should have later. For example, enter "Work:Testanim" in the input field below the list and press the key.
-
Now select the drawer in the file list that contains the previously calculated individual images.
-
Now click on the calculated images one after the other, first "Test.0000", then "Test.0001" etc. The clicked images are displayed with their names on the right of the list. There you can easily see whether you have clicked too many or too few and correct it there if necessary.
-
Then click the "Build" icon. "AnimBuild now calculates an executable animation in Anım Opt 5 format from the 150 individual images. This may take a while.
-
Now start the "ViewTek" program, enter the name of the calculated animation (e.g. "Work:Testanim") in the file selection window and click "OK".
You can now admire your first colored animation. The cube not only performs several superimposed movements, but also changes its color at the same time.
Note
The scene can also be found on the hard drive under the name "Tutorial 5".
7. Special Effects
Finally, you should learn how to use special effects. We start from the last scene with the colored cube.
Please look again at the timeline. The bottom "Eff." track is intended for special effects. MaxonCINEMA 4D knows many of them. You can make an object explode, flap it in the wind like a flag, or melt it like butter in the oven.
-
First activate the cube in the document window. Call up the "Subdivide" function from the "Tools" menu four times in a row.
The cube now consists of many small squares. This is necessary so that the explosion you are now entering looks realistic. There should be as many fragments flying around as possible.
-
Draw a new sequence on the "Eff." track, ranging from 0 seconds to 10 seconds.
-
First a window appears in which you can select the special effect type. Leave Explosion set and click OK.
-
Now the "Explosion" window appears, where you can set various parameters of the explosion. Again, leave the parameters untouched and click “OK,,.
-
Start the image calculation again and assemble the individual images into an animation.
In addition to the cube moving and discoloring, you can now see the cube flying apart in all directions.
Note
The scene can also be found on the hard drive under the name "Tutorial 6".
8. Skeleton Animation
The fine art of animation is the movement of figures and people in animations. With MaxonCINEMA 4D, this too becomes child's play.
-
Close all documents and create a new one. Call the "Figure" function from the "Objects/Special Objects" menu.
MaxonCINEMA 4D now automatically creates a simple, stylized human figure with movable limbs. It is ideal for animation, since all axes and hierarchies are already prepared for skeleton animation.
-
Open the time window and set the time O seconds.
-
Click on the 'Edit Objects' icon on the main bar, set the action to 'Rotate', and activate the 'X' icon.
Now you're good to go.
-
Activate the "Upper Arm" object (it's in the "Figure!'Torso" object set and click on "Record". Now the position and direction of the upper arm at time 0 seconds is fixed and stored in a key.
-
Set the timing 10 seconds. Now rotate the upper arm from its original position and press record again. Again, the direction is stored in a key.
This does not differ in any way from the previous animation of the cube.
-
Now activate the "Forearm" object. It is a sub-object of the upper arm. First go to time O seconds and press "Record". Then jump to the end of the animation. Rotate the forearm a little more than the upper arm and click Record.
MaxonCINEMA 4D has now calculated the position of the lower arm in relation to its parent object "upper arm" and saved it in a key.
If the upper arm rotates, the lower arm automatically follows without the whole arm separating. In addition, the lower arm performs a movement that is superimposed on the upper arm.
-
Now move the other limbs of the figure in the same way.
-
Let the animation be calculated with the "SW surface display" and look at the result in the "Play" window.
Note
For movements that appear natural, you should set the spatial interpolation type to "cubic".
Note
You can also find this scene on hard drive under the name "Tutorial 7".